
Approaches to Identify Oil Caning On Your Metal Surfaces
In this blog post AutoForm Technical Product Manager, Markus Avermann from Germany, describes a strategy for identifying the existence of oil canning issues using AutoForm. In particular he reveals a method that analyzes the measurement of force between the sheet surface and a purposely added clamp. This is our first post to our two part oil canning series, the second of which covers strategies for handling oil-canning.
Recently our community has asked “How can we deal with oil canning?” which led to this three part series. Oil-canning usually occurs when there are uneven stretches and/or heterogeneous stress distributions across a flat area or one that has little to no geometric features. The issue of oil-canning needs to be identified and addressed because it jeopardizes the robustness of the produced part, which in turn can affect the effectiveness of spring back compensation.
The example part below features an oil-canning issue. The nominal part shape and the simulated sheet after spring back are displayed below with different result variable views. In AutoForm the colors imply: purple is thickening, yellow/orange means a lot of stretch for formability, blue is a thickness increase, orange/red is a thickness decrease. Red shows risks of splits. Dark purple shows the springback is positive (rose in an upward direction). On the Formability Check, grey shows there is not enough stretch.
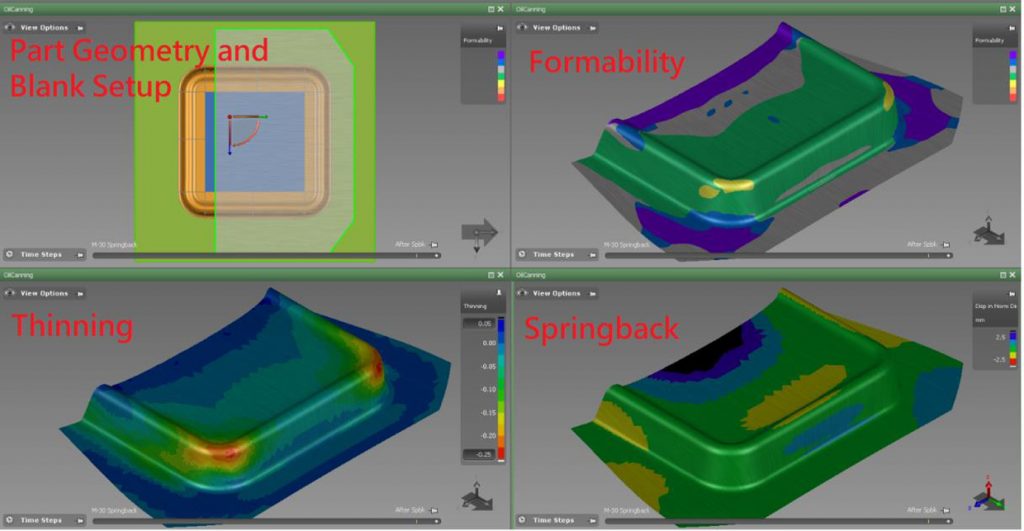
Fig. 1: Part and Finished Sheet.
From the spring back results in the lower-right tab, we can see how the sheet bulges in convex form in the dark-blue area. In order to compensate such springback AutoForm can be used to lower the nominal flat surface. However, due to the fact that the convex shown in the spring back tab in the figure is a result of oil-canning and not of normal spring back, the attempt at compensation only causes the convex to pop into a concave direction. Subsequent spring back compensation attempts cannot converge as shown in the figure below. No matter how many compensation iterations are attempted, no matter the brand of software used, the stretch and stress conditions will still cause the surface to bulge or cave.
Thus, the real problem is: without a detailed analysis a user might attempt to handle the problematic area as if it was a “normal“ springback behavior and approach the problem by attempting to eliminate the convex area in the sheet by compensating the tool accordingly (we might produce a tool with a concave area using the same amount of mm). If we proceed with this type of compensation, we would immediately see that the sheet produced by the compensated tool would now be concave where it was convex (see Fig. 2 below: 1st compensation). In order to compensate this new springback effect we would have to produce a new tool with a convex area wherever the sheet was concave. For the sake of demonstrating this line of thought we’ve pursued this “strategy” and the results obtained for the first three compensation loops are shown below in Figure 2. Upon examining the results it would have become quite clear that the compensation attempts were not effective and that we had wasted our time just because we had not analyzed the phenomenon very carefully.

Fig. 2: Compensation Attempts
Therefore, in order to avoid this problem we must firstly know how to identify where oil canning is occurring on a metal surface and secondly we must have strategies to deal with it.
Identifying Oil Canning
Therefore the first step, which is the most important because it would steer us directly in the correct direction to fix the problem, is the identification of the issue through an accurate analysis.
Oil canning can be identified through the examination of a result variable in AutoForm during the simulation stage. If we take a look at the minor stresses result variable of the stamped sheets there are tell-tale indicators that would alert us. Consider that when a sheet springs back after being stamped it’s only trying to “relax” as some residual stress remains.
Yet where the sheet should enter a relaxed-state, the surface will bulk up showing that it cannot do that. Now the residual stresses will remain in that area. In AutoForm, the “minor stress inspection” would locate where this effect is occurring. For a thorough analysis it needs to display the “minor stress results variable” at the top, middle or bottom layers (fiber) of the metal sheet for inspection. A typical springback behavior would show similar stress values on the bottom and top side of the panel.
Instead, a typical “oil-canning” effect would show a stretch stress (bulking out) on one side while the other side would show a compression stress. Therefore, a tell-tale sign which indicates an oil-canning issue is seen in the different stress values on the two sides. Besides, if also the “formability” result shows an insufficient stretch in the same area, then we can conclude the analysis is saying that we are incurring in this type of issue and that compensation would not represent the most effective countermeasure.
Viewing the Cross-Section of the Sheet
We have just seen how to identify the presence of this issue by analyzing the minor stress states at the upper and lower layer of the sheet metal together with the formability result; now let’s see another way run that analysis.
This alternative method to detect oil canning consists in analyzing the cross-section of the sheet where the bulging occurs and positioning a new one-sided clamp on the panel during springback evaluation and examine its effects. We at AutoForm, within our solution, allow users to vary the positioning of this clamp in multiple-run simulation and examine the amount of force arising from contact between the sheet and the clamp, as the clamp variable virtually shifts that clamp against the metal surface. By applying such contact force, vertically, at some point the sheet will “pop out” showing a zero point of contact upon the clamp. Bingo.
To clarify this, just consider what happens when you press your finger against a convex surface. As you press your finger you’ll find that suddenly the sheet metal pops-outwards to a concave surface. At the very moment it pops out contact between your finger and the sheet metal surface was lost, seeing that the sheet suddenly popped out away from the oncoming pressure applied by your finger. It jumped outwards creating the zero point of contact that we can simulate and use to virtually identify oil-canning.
The fact is you cannot handle oil canning with a single simulation, although at first it is easy to identify significant minor-stress on a panel. By using AutoForm-Sigma, which is known in the industry for its ability to carry out multiple simulation runs, you can define positions for an additional clamp, added to the panel, in order to find the offending springback. The simulations will identify stability zones when looking at the forces upon the clamp.
The key is in configuring a range of Displacement along Geometry Normal as a design variable for the clamp, when setting up your simulation. You’ll then examine springback and forces in the normal direction of the sheet at different positions of the third clamp.
Let’s consider another example part for identifying oil canning in AutoForm.
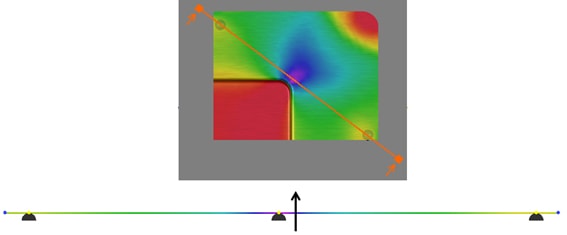
Fig. 3: Add a 3rd Clamp “Supporting Below” at the position of negative stress.
At first glance this graph might seem a little strange. But it displays where (and to what extent of force) the clamp comes into contact with the sheet. The first useful information we can gather from this force-plot is where exactly oil canning most-occurs.
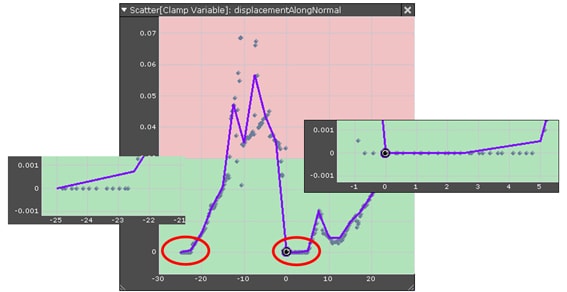
Fig. 4: Scatter plot of contact forces, X axis is the displacement along the normal line (movement of the sheet), and Y axis is the force in kN.
The contact force of the clamp starts at zero (figure 2) and it should increase as the clamp is moved forward against the sheet. At some point, however, the “Scatter plot of contact forces” shows that a second zero point of contact force occurs. That is a clear indication oil canning is occurring. The clamp has suddenly lost contact seeing the panel has abruptly popped in the out-going direction.
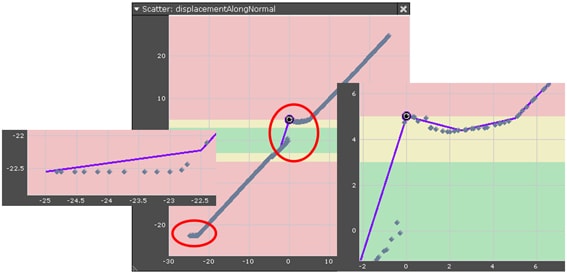
Fig. 5: Scatter plot of Material Displacement
By checking the “Scatter plot of Material Displacement” you see where the variable clamp touches the sheet and what displacement occurs on the sheet according to the design variable of the clamp. The graph shows that where you would typically see a straight line of constantly increasing displacement, there is a sudden deviation of displacement, breaking the straight line. Logically the position coincides with the “Scatter plot of contact forces” already examined and again identifies the sudden popping out of the bulging material.
How you deal with oil canning is entirely up to you and your company’s standards. In our second post to this oil canning series we introduce counter measures.
For training on identifying this issue yourself, contact your local AutoForm Office
See part two where we share our strategies for handling oil canning! And don’t forget to sign up for this blog.


