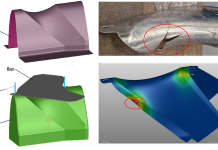
In the next generation of automotive development, the concept of CASE (Connected, Autonomous, Shared and Electric) is undoubtedly gaining traction. As one of the solutions to the trade-off problem between crash safe vs. lightweight, ultra-high strength steel (UHSS) is being increasingly utilized. Although UHSS is very strong, it comes with inherent formability and springback control problems. As such, it becomes quite challenging to develop high quality parts within a short lead-time by using traditional engineering processes. At the company, represented in this Anonymous Customer Story, they previously employed press-forming simulation for feasibility studies only, but have since incorporated simulation earlier in the product design to avoid difficult situations that may arise later in the process. In this article, we outline their approach to feasibility studies of a UHSS structural part, from a springback compensation perspective.
Method
During the early feasibility study, there is more flexibility in terms of part modifications than there is later on, during the engineering phase. Therefore, it is important to perform feasibility studies regarding springback so that geometrical features can be added to reduce the springback magnitude. For a comprehensive study, we must consider the entire stamping process result, but this means that all tool geometries must be available in good quality. This may require some time, which could delay the study to the extent that the part becomes “frozen” and no changes will be accepted due to the “domino” cost effect this would ignite. With this in mind, AutoForm has developed a parametric geometry design module through which the user can draft the tool, evaluate different geometry modifications, and determine the most effective geometry in terms of springback reduction. Let’s examine how this works in an actual project.
Target Part
The initial part geometry is shown in Fig. 1. It is structural part, with a thickness of 1mm and UHSS 1180MPa tensile strength. The process plan consists of a first and second forming, followed by piercing/trimming operations. The anonymous company had worked on similar parts in the past, but this was their first experience working on this part in this particular material.

Fig. 1: Target part

Fig. 2: Forming Process and Final Part Springback (Color range: ±15mm)
The entire forming process was simulated, with Fig. 2 showing the springback measured as material displacement in the normal direction following the final operation. In this figure, a negative value signifies “opening” direction displacement. If we take a look at the minimum value, we see the part springing back more than 25mm. By compensating the tool according to this result, we would create undercut areas in the drawing tool. This would require altering the process plan (e.g., additional cam forming or stations to change the tipping), which would lead to a higher tool cost. Considering the parameter of reducing the springback to a magnitude that does not require any changes to the process, we evaluated three geometrical features and related design parameters:
- Embossments on the part walls (position and depth value definition)
- Shape for first forming
- Step height on the top surface
The final goal is to reduce springback to less than 7mm on the walls, a value beyond which the tool would have undercuts.
Strategy 1 – Embossment on the walls

Fig. 3: (Left) Nominal shape and springback part after final forming; (Right) Creation of parametric rib feature in the flanged walls
The part geometry was modified by adding the ribs on the wall, but the question is: what is the most effective depth value, i.e., that reduces springback the most? In looking for the best solution, we did not use the typical deterministic approach but rather, we varied the depth from zero (no change at all) to a maximum 7mm. This way, we could evaluate the results for values in this range and select the most effective one. Six ribs were added to both flanges.
Analysis did not return any value that would produce springback lower than 7 mm (our initial target), as shown in Fig. 4. In addition, reaching the lowest value would also mean increasing the risk of splits (springback is not the only issue in metal forming). Therefore, we decided to set a “new” target maximum of 10mm to reduce springback as much as we could in a meaningful way.

Fig. 4 Possible minimum springback amount (color range ±15mm, displacement in normal direction)
The depths values could then be easily defined by examining the process window. In other words, we could study which values would have produced ~10mm springback and avoided splits (max failure result variable lower than 1). As a result, we decided to set the depth to 4.5mm and 6mm.
Strategy 2 – Optimization for bending angle in first forming operation
So far, we have only reduced the springback from 25mm to roughly 10mm. Our job is not done yet as the final target is still 7mm if we want to avoid undercuts in the compensated tool.

Fig. 5 Result of Case 1 (range ±9mm, displacement in normal direction)
The first forming operation is a crash forming process, shown in Fig. 6. The forming tool is defined by the homogeneous section.

Fig. 6 (Left) Forming steel of first forming; (Right) Variation for bending angle in first operation (section view)
The final part shape is formed in the second forming operation, so the geometry of the first forming can be adapted as necessary. The angle of the intermediate shape can influence the re-bending amount or the distribution of bending history on the final flange wall. Therefore, we focused on finding the “best” bending angle of the forming using our systematic approach, which would allow us a more comprehensive view of the sheet’s behavior.
Rather than set a specific value, we defined a range within which the bending could vary (see Fig. 6, right). The bending angle in the original process was 30 degrees from the horizontal axis, and it will be inclined from 10 degree more to 20 degree less. We limited the inclination to 10 degrees downward in order to avoid a locating problem in the next operation (interference with tool and restrike). In the original process, both flanges shared the same angle but in this case, they can vary independently.

Fig. 7: Comparison of springback results after minimization method 1 and 2
The resulting analysis showed that there was no significant improvement gained by employing this second strategy of optimizing the bending angle. The springback was slightly reduced, but 9 mm is still higher than our target.
Strategy 3 – Adding step geometry to the top surface
In a third attempt to reduce springback, we added a stiffener step onto the top surface.
Since there are two distinguished mating areas on the top surface, meaning they are involved in the assembly of this part with others of the car body, we can only locate the step outside of these areas (see Fig. 8). We investigated the effect of this step for a maximum height of ±5 mm to see which value would generate the greatest benefit.

Fig. 8: Area of step geometry
A scatter plot analysis determined that a 7mm springback could be reached for a step height between -2.1mm and 0.7mm. Finally, we have achieved the below springback result with step height -1.5 mm (we adopted this value).

Fig. 9: Springback result with step height -1.5mm (range ±7mm, displacement in normal direction)
As a final check, we decided to generate the compensated tool geometry according to the springback results we obtained after these modifications. Fig. 10 shows the backdraft analysis of the compensated tools. As you can see, the results are positive – the part can be compensated with the tool. We always recommend checking the stability of the results to ensure that the compensation strategies will converge.

Fig. 10: Draft analysis of the compensated forming tool
Conclusions
The initial target set by our anonymous customer aimed to achieve a final springback lower than 7mm on the flange areas of the part while ensuring a direct tool compensation would not introduce any backdraft into the geometry.
Using AutoForm, we systematically reduced the springback magnitude by applying geometrical modifications to the part, only after a thorough “cause-effect” analysis of the most effective parameters. The ability to evaluate strategies consistently and rapidly simplified and shortened the entire process.
Although robustness analyses were performed in the project, they did not fall within the subject of this article. For the sake of completeness, we always recommend evaluating the robustness of the process before compensating the tools and looking for the best compensation strategy. It is vital to understand the effect of unwanted “noise” differences in process parameters that occur in reality.
AutoForm Japan: Takayuki Yamamoto & Hironori Imai


